Tutorial
We will create a wearable cognitive assistant that recognize a person or a chair in this tutorial. First, let’s get the example code running before going into its implementation.
- Install gabrieltool.
- Download gabriel_example.py and the object detector into the same directory. This object detector is the SSD MobileNet v2 DNN from Tensorflow Object Detection API model zoo. In this example, we will use this object detector to detect people and chairs.
wget https://raw.githubusercontent.com/cmusatyalab/OpenWorkflow/master/examples/gabriel_example.py
wget https://storage.cmusatyalab.org/openworkflow/ssd_mobilenet_v2_saved_model.zip
- Unzip the downloaded object detector into the same directory.
unzip ssd_mobilenet_v2_saved_model.zip
- Launch the gabriel server.
python ./gabriel_example.py run_gabriel_server
- In the console, you should see log messages of building the FSM, starting gabriel server, and then launching a docker container.
- You should also be able to see the container started using docker commands. Note that it may take a few minutes to download the container image before the container is started.
docker ps -a --filter="name=GABRIELTOOL"
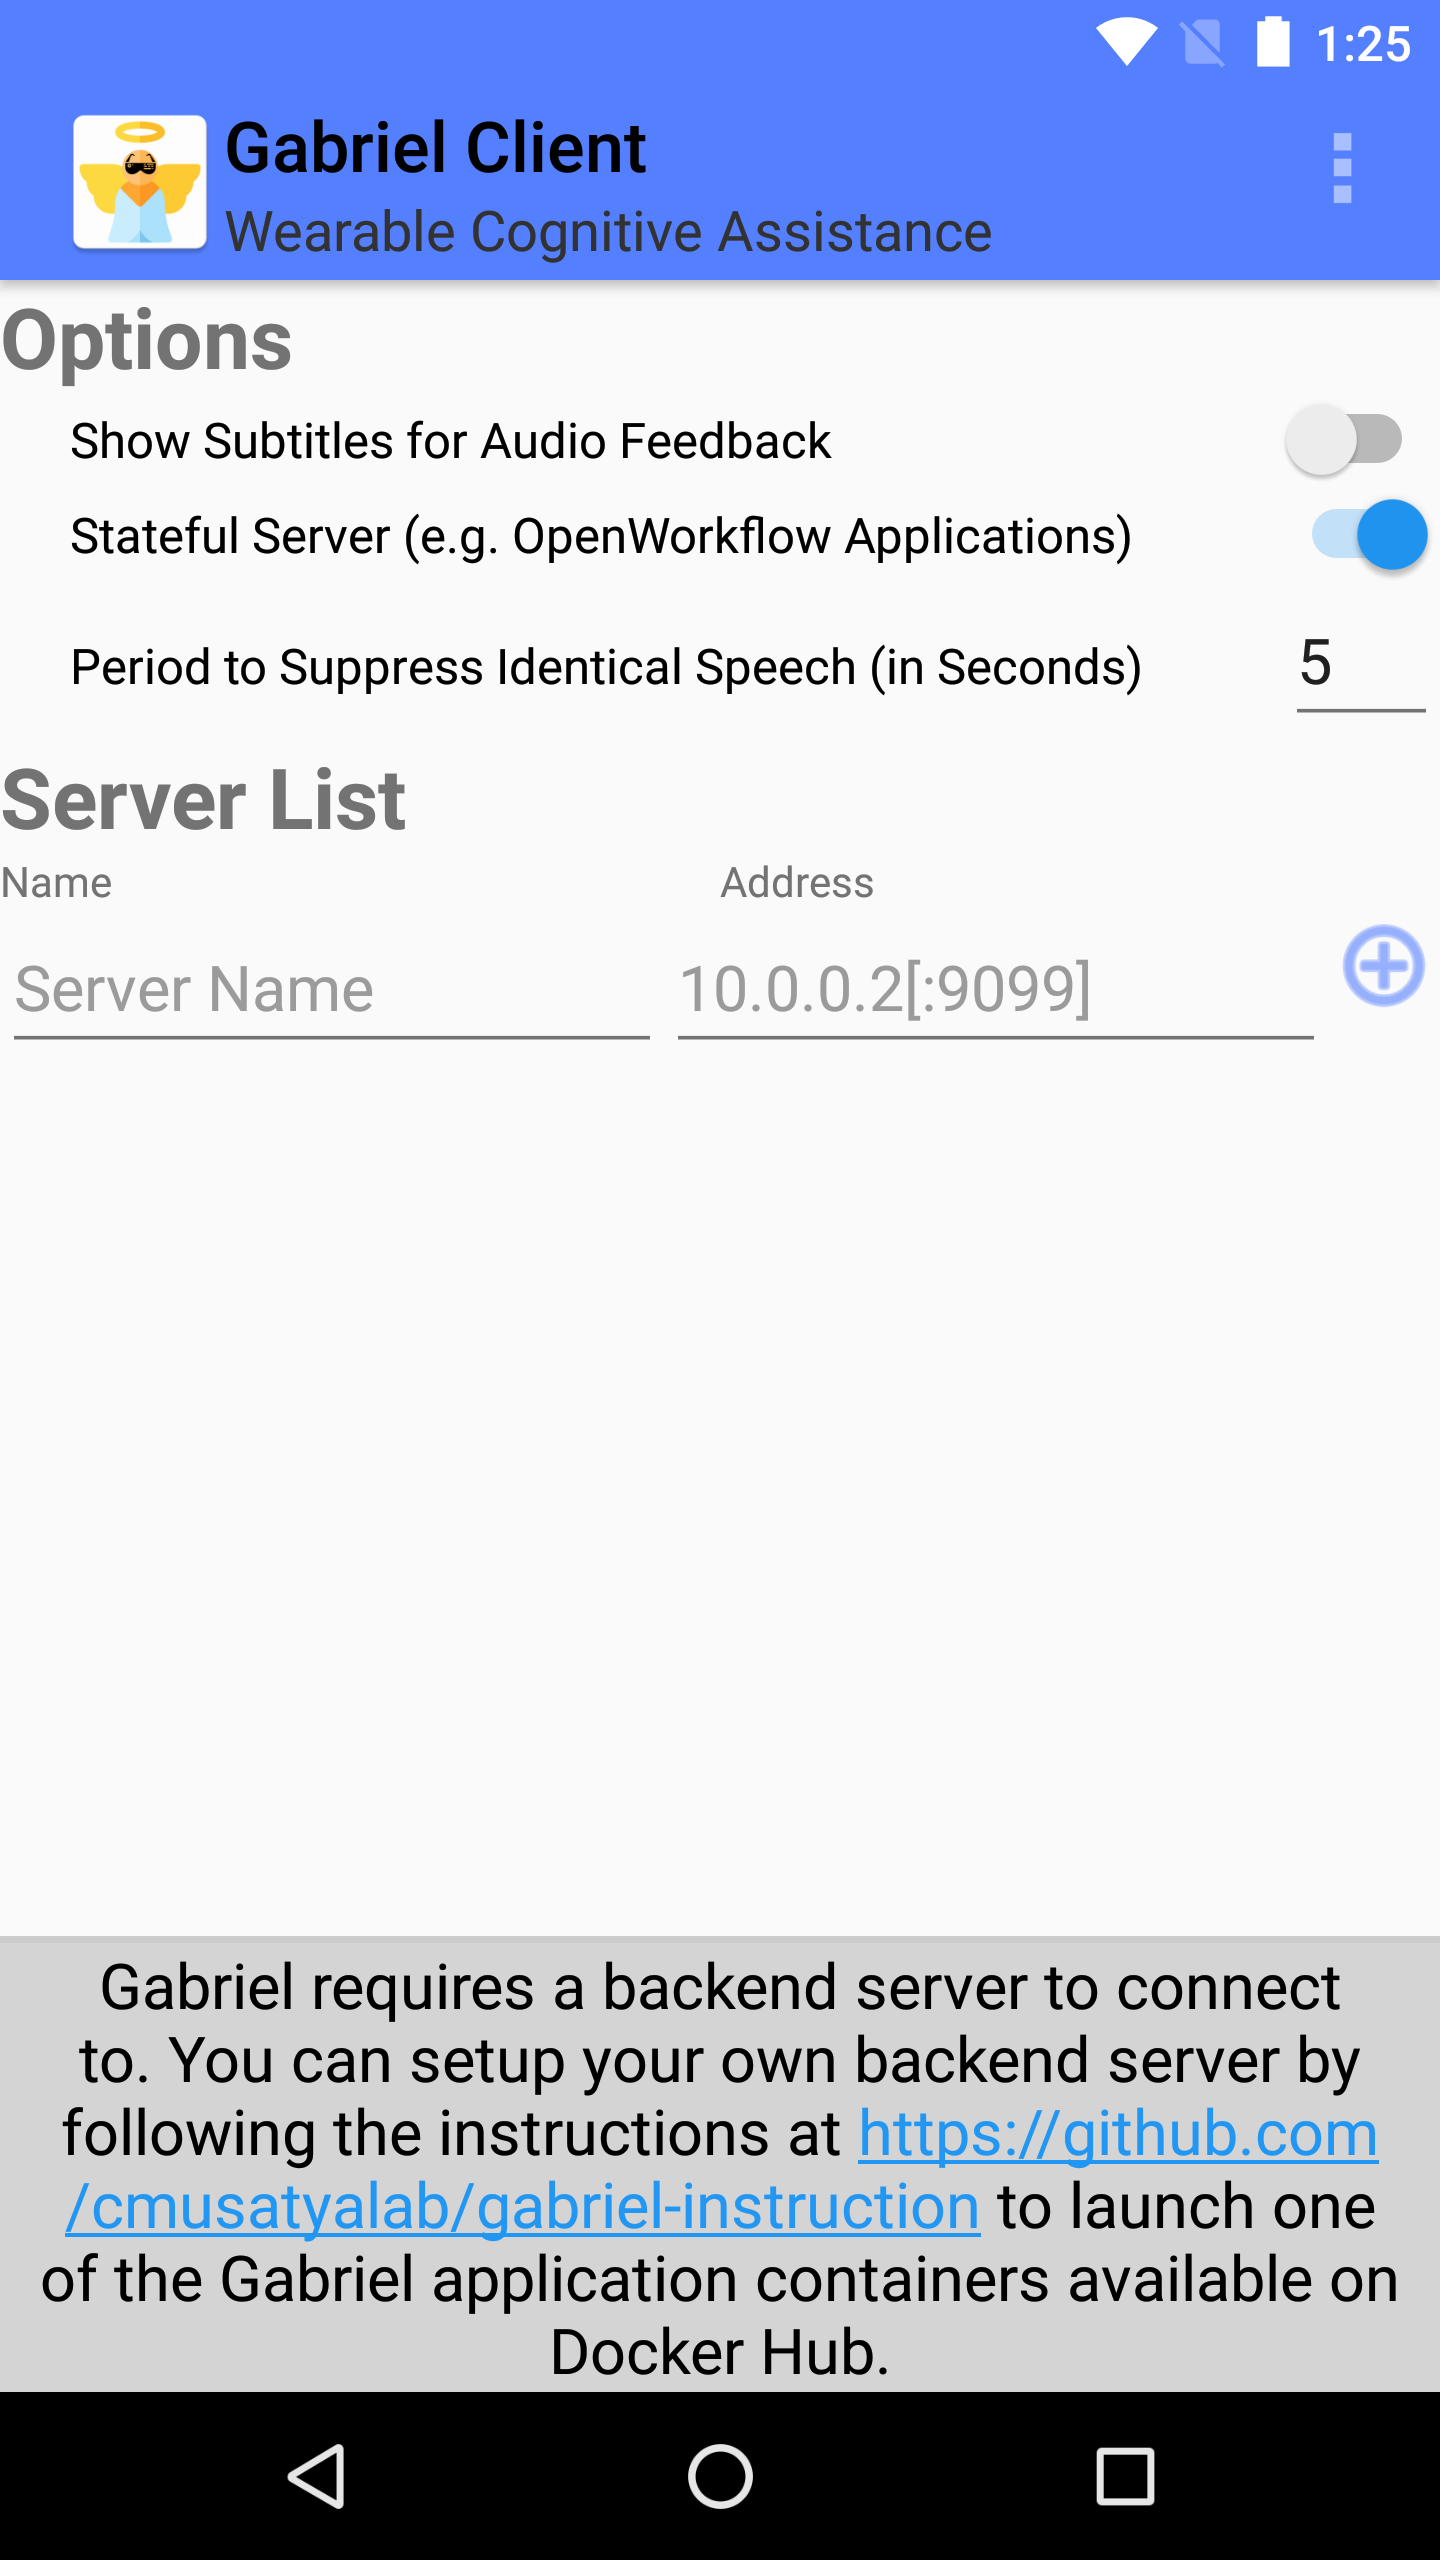
- Once you see the container is up, the server is ready for connection. Download Gabriel client from Android Play Store to connect to the server and try the application out. Make sure to turn on option “Stateful Server (e.g. OpenWorkflow Applications)”. You should turn this option on for all gabriel applications made with OpenWorkflow.
- When the client has a person or a chair in view, the application should say “Found Person” or “Found chair” correspondingly.
- Once you’re done with the demo, make sure to clean up the created docker container with the following commands.
docker stop -t 0 $(docker ps -a -q --filter="name=GABRIELTOOL")
Now you’ve gotten the code running, let see what is happening under the hood. We will focus on explaining how to create a gabriel server in the later half of this tutorial. The example code contains a few more use cases of the gabrieltool package.
You can create the same FSM using either the gabrieltool python library or the Web Editor. In general, the web GUI is good for simple applications while the python library provides more flexibility and supports more customizable application logic. Below we will create the same application using both methods. If you prefer not to write any code, skip to the Web Editor section.
Using Python Library
The FSM has two states. The first state is st_start. We want to send a welcome message when a user first connects. Therefore, st_start doesn’t have any processing involved and will always transition immediately to the next state and return a welcome message to the client.
The second state st_tf is the core of this application. When in this state, input sensor data, which is an image in this example, is analyzed by our object detector to see if there is a person or a chair. This is specified by a fsm.Processor with a processor_zoo.TFServingContainerCallable. Since we want to recognize either a person or a chair, we define two transitions, one for person, another for chair. These transitions have predicates checking whether the person or the chair object class exist in the output of our TFServingContainerCallable processor. If a person is found, the person transition will be taken and return an instruction of ‘Found Person’ to the Gabriel client.
1 2 3 4 5 6 7 8 9 10 11 12 13 14 15 16 17 18 19 20 21 22 23 24 25 26 27 28 29 30 31 32 33 34 35 36 37 38 39 40 41 42 43 44 45 46 47 48 49 50 51 52 53 54 55 56 57 58 59 60 61 62 63 64 65 66 67 68 69 | import cv2
import fire
from logzero import logger
from gabriel_server.local_engine import runner as gabriel_runner
from gabrieltool.statemachine import fsm, predicate_zoo, processor_zoo, runner
def _build_fsm():
"""Build an example FSM for detecting a person or a chair.
Returns:
gabrieltool.statemchine.fsm.State -- The start state of the generated FSM.
"""
st_start = fsm.State(
name='start',
processors=[],
transitions=[
fsm.Transition(
name='tran_start_to_proc',
predicates=[
fsm.TransitionPredicate(
callable_obj=predicate_zoo.Always()
)
],
instruction=fsm.Instruction(audio='This app will tell you if a person or a chair is present.')
)
]
)
st_tf = fsm.State(
name='tf_serving',
processors=[fsm.Processor(
name='proc_start',
callable_obj=processor_zoo.TFServingContainerCallable('ssd_mobilenet_v2',
'ssd_mobilenet_v2_saved_model',
conf_threshold=0.8
)
)],
transitions=[
fsm.Transition(
name='tf_serving_to_tf_serving_person',
predicates=[
fsm.TransitionPredicate(
# person id is 1 in coco labelmap
callable_obj=predicate_zoo.HasObjectClass(class_name='1')
)
],
instruction=fsm.Instruction(audio='Found Person!')
),
fsm.Transition(
name='tf_serving_to_tf_serving_chair',
predicates=[
fsm.TransitionPredicate(
# You can also use the custom transition predicate we
# created in _add_custom_transition_predicate here. e.g.
# callable_obj=predicate_zoo.HasChairClass()
callable_obj=predicate_zoo.HasObjectClass(class_name='62')
)
],
instruction=fsm.Instruction(audio='Found Chair!')
)
]
)
# We need the state objects to mark the destinations of transitions
st_start.transitions[0].next_state = st_tf
st_tf.transitions[0].next_state = st_tf
st_tf.transitions[1].next_state = st_tf
return st_start
|
The st_tf state could also use a custom transition predicate defined by the following function. To learn more about the how to use and create custom FSM processors and transition predicates, see its API documentation.
1 2 3 4 5 6 7 8 9 10 11 12 13 14 | def _add_custom_transition_predicates():
"""Here is how you can add a custom transition predicate to the predicate zoo
See _build_fsm to see how this custom transition predicate is used
"""
from gabrieltool.statemachine import callable_zoo
class HasChairClass(callable_zoo.CallableBase):
def __call__(self, app_state):
# id 62 is chair
return '62' in app_state
predicate_zoo.HasChairClass = HasChairClass
|
The gabriel cognitive engine is created using a FSM cognitive engine runner.
1 2 3 4 5 6 7 8 9 10 11 12 13 14 15 16 17 18 19 20 21 | def run_gabriel_server():
"""Create and execute a gabriel server for detecting people.
This gabriel server uses a gabrieltool.statemachine.fsm to represents
application logic. Use Gabriel Client to stream images and receive feedback.
"""
logger.info('Building Person Detection FSM...')
start_state = _build_fsm()
logger.info('Initializing Cognitive Engine...')
# engine_name has to be 'instruction' to work with
# gabriel client from App Store. Someone working on Gabriel needs to fix this.
engine_name = 'instruction'
logger.info('Launching Gabriel server...')
gabriel_runner.run(
engine_setup=lambda: runner.BasicCognitiveEngineRunner(
engine_name=engine_name, fsm=start_state),
engine_name=engine_name,
input_queue_maxsize=60,
port=9099,
num_tokens=1
)
|
Gabrieltool currently doesn’t support cleaning up the launched containers automatically. You can stop and remove all gabrieltool related containers using the following command.
docker stop -t 0 $(docker ps -a -q --filter="name=GABRIELTOOL")
Using OpenWorkflow State Machine Web Editor
Let’s use the Web Editor to create the same application.
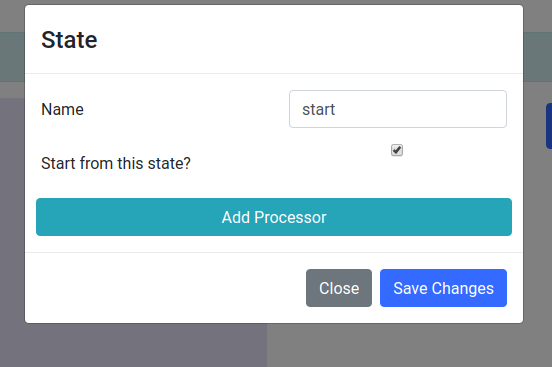
First, let’s create states. Go to Add >> State.
start state:
- name: “start”
- Check Start from this state.
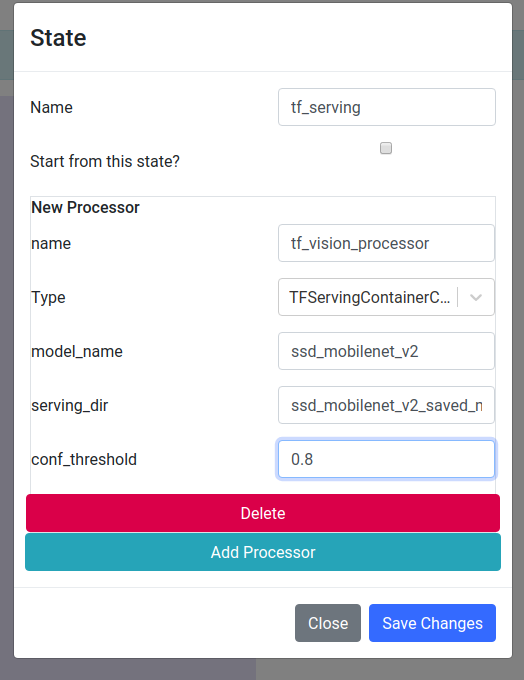
tf_serving state:
name: “tf_serving”
add a new processor
- name: “tf_vision_processor”
- type: “TFServingContainerCallable”
- model_name: “ssd_mobilenet_v2”
- serving_dir: “ssd_mobilenet_v2_saved_model”. This is directory of the downloaded and unzipped model.
- conf_threshold: 0.8
chair_detected state:
- name: “chair_detected”

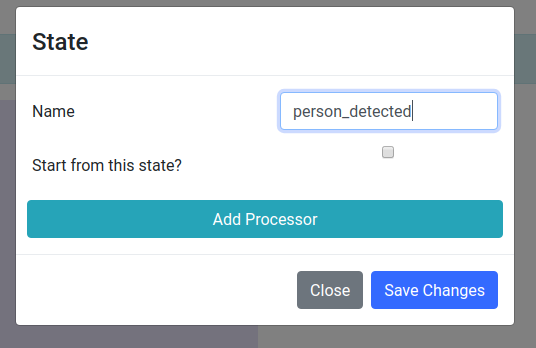
person_detected state:
- name: “person_detected”
Now, let’s add transitions. Go to Add >> Transition
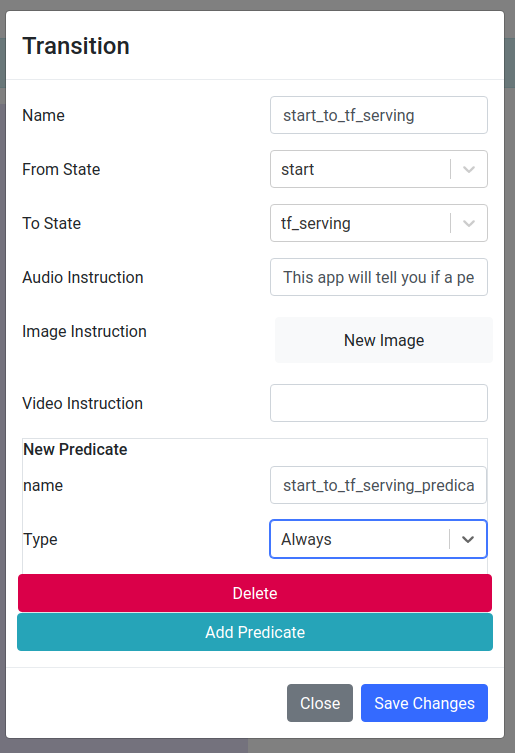
start to tf_serving
name: “start_to_tf_serving”
From State: start
To State: tf_serving
Audio Instruction: “This app will tell you if a person or a chair is present.”
Add Predicate
- name: “start_to_tf_serving_predicate”
- type: Always
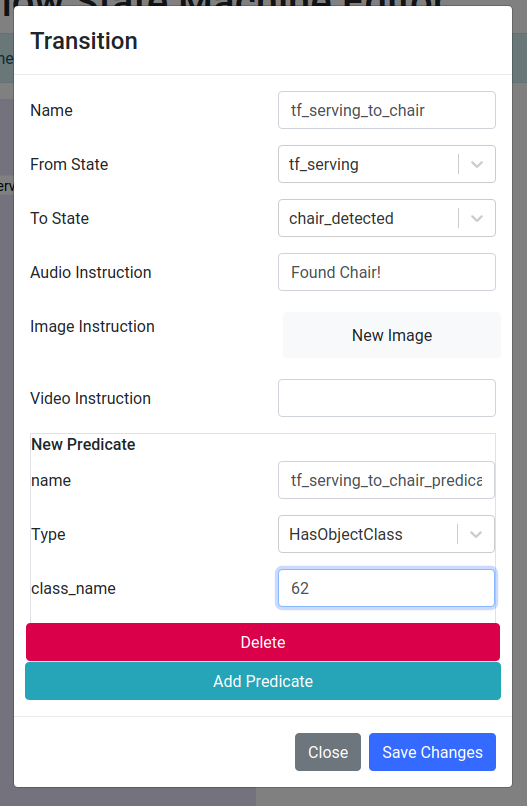
tf_serving to chair_detected
name: “tf_serving_to_chair”
From State: tf_serving
To State: chair_detected
Audio Instruction: “Found Chair!”
Add Predicate
- name: “tf_serving_to_chair_predicate”
- type: HasObjectClass
- class_name: 62
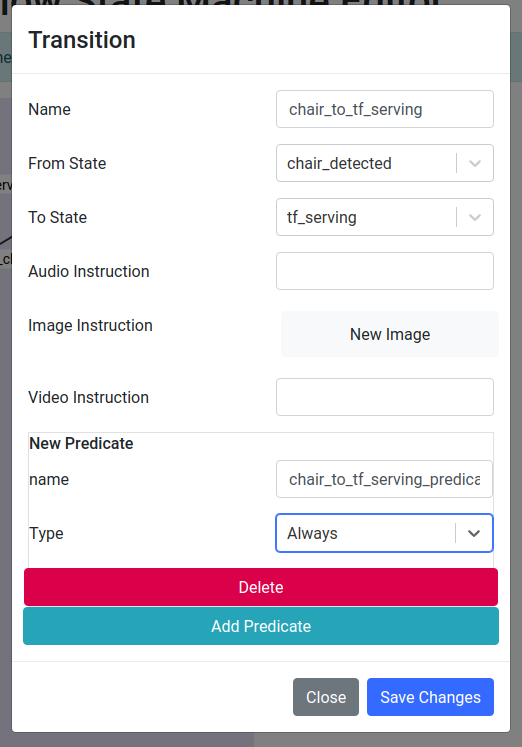
chair_detected back to tf_serving
name: “chair_to_tf_serving”
From State: chair_detected
To State: tf_serving
Add Predicate
- name: “chair_to_tf_serving_predicate”
- type: Always
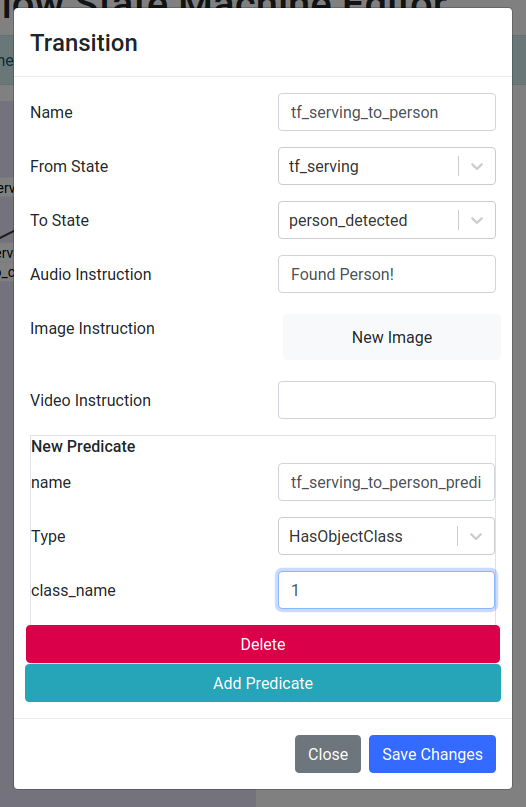
tf_serving to person_detected
name: “tf_serving_to_person”
From State: tf_serving
To State: person_detected
Audio Instruction: “Found Person!”
Add Predicate
- name: “tf_serving_to_person_predicate”
- type: HasObjectClass
- class_name: 1
person_detected back to tf_serving
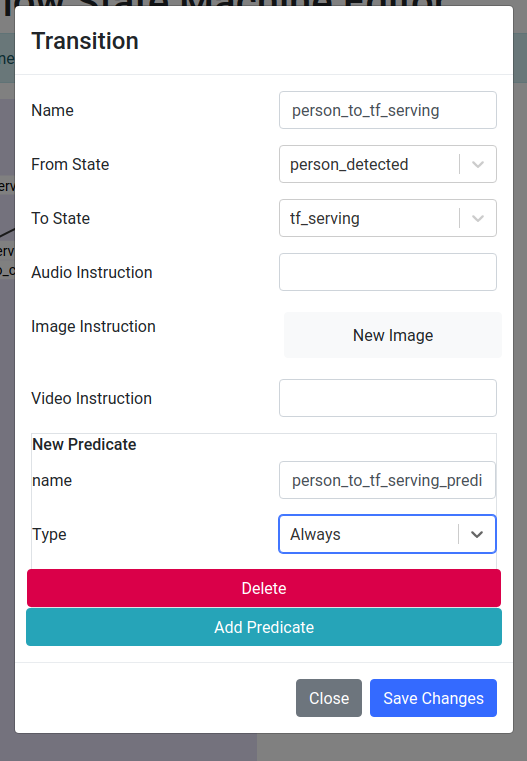
name: “person_to_tf_serving”
From State: person_detected
To State: tf_serving
Add Predicate
- name: “person_to_tf_serving_predicate”
- type: Always
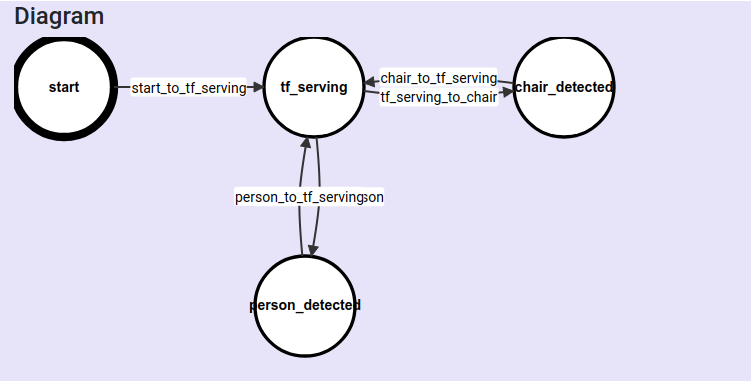
By now, we have finished creating the FSM. The complete FSM looks as follows.
Let’s export the FSM to the same directory of our object detector. The directory structure should look like the following.
Gabrieltool CLI provides a convenient command-line tool to launch a gabriel server with the exported FSM. Connect Gabriel Client to your server. Make sure to turn on option “Stateful Server (e.g. OpenWorkflow Applications)” in the client. When you point the client to a person or a chair, the application should say “Found Person” or “Found chair” correspondingly.
gbt run ./app.pbfsm
Once you’re done with the demo, make sure to clean up the created docker container with the following commands.
docker stop -t 0 $(docker ps -a -q --filter="name=GABRIELTOOL")
